

This is after installing your ‘SQL Server 2025 Installation‘ with ‘SQL Server Management Studio 22‘, as detailed in our earlier blog post. Today, we are going to talk about configuring SSMS-22.
The SSMS is the most powerful tool used by SQL developers and Database administrators (DBAs) in the industry.
However, there’s something important to note:
- Installing SSMS is only the first step.
- Configuring it properly is what makes you productive.
Using SSMS is very easy for beginners: you open SSMS and can start writing SQL queries immediately. However, if you want to become a pro at using SSMS, then you’ve come to the right place.
In this guide, you are going to learn the exact configuration steps of SSMS. Step by step In simple language.
This article is perfect for beginners learning SQL Server:
- Beginners learning SQL Server
- Students
- Junior DBAs
- Developers starting with databases.
Let’s begin.
Before you can configure anything, you must connect correctly.
Step 1: Connect to Your SQL Server Properly
When you open SSMS, you see the Connect to Server window. You need:
- Server Name
- Authentication type
If SQL Server is installed on your computer, try:
localhostor
.If you are using Windows Authentication, select:
✔ Windows Authentication
Then click Connect
Once connected, you will see your server in Object Explorer.
To connect to a remote SQL Server, you must know:
- Server IP address or hostname
- Login credentials (SQL login or Windows login)
- SQL Server port (default is 1433)
Now go to your computer.
Open SSMS.
In the Connect to Server window:
Put the remote server name or IP address and select appropriate credentials to connect.

Now you are ready to configure.
Step 2: Enable Line Numbers (Very Important)
This is one of the first things every DBA does. By default, SSMS does not show line numbers in the query window.

But line numbers help you:
- Find errors quickly
- Debug stored procedures
- Understand error messages
How to Enable Line Numbers?
Click Tools

Click Options

Expand Text Editor – expand Transact-SQL, click General. If you are using SSMS 22 or above, you can find this option under the Language section.

Check the box:
✔ Line numbers
Now open a new query window. You will see numbers on the left side.

Simple change. Big improvement.
Step 3: Set Default Results to Grid
When you run a query, results can appear in:
- Grid
- Text
- File
For beginners, Results to Grid is best.
At the top toolbar, make sure this icon is selected:
📊 Results to Grid
Or use shortcut:
Ctrl + DWithout Grid view query result:

With Grid view query result:

Grid view is:
- Easy to read
- Sortable
- Cleaner
Step 4: Increase Query Timeout (Optional but Smart)
In SQL Server Management Studio (SSMS), you can configure the query execution timeout to prevent long-running queries from being interrupted before completion. By default, SSMS sets the execution timeout to 0 seconds, meaning unlimited wait time.
However, this value may be changed in some environments, causing queries to stop prematurely. To modify this setting,
- Go to Tools
- Click Options
- Expand Query Execution
- Click SQL Server
- Click General
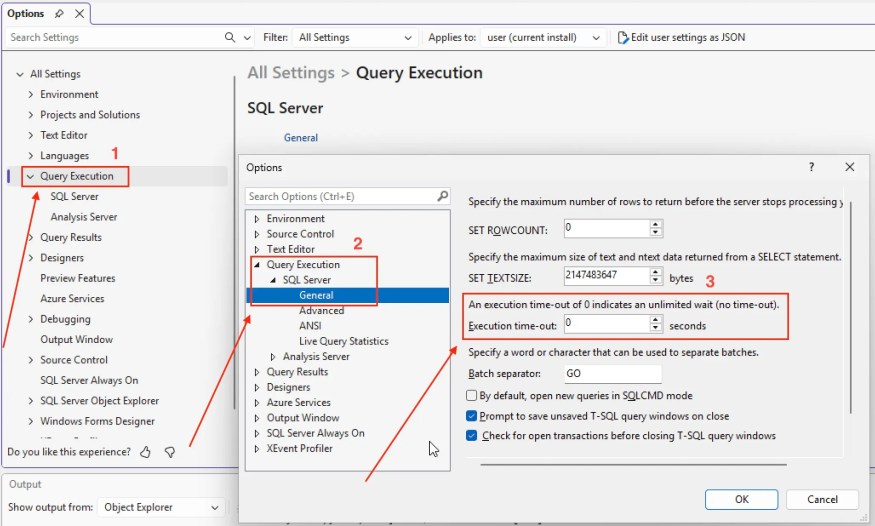
You will see:
Execution time-out (seconds)The default is usually 0 (no limit); if it’s set to something low, like 30 seconds, increase it. For learning, 0 is fine.
Setting a higher value, such as 600 or 1200 seconds, allows complex queries, index rebuilds, data migrations or large report executions to complete without timing out. Increasing the query timeout does not change the SQL Server engine configuration itself; it only affects how long SSMS waits for a query to finish before cancelling it. (What to Configure in SSMS First?)
Step 5: Configure Auto Recover (Very Important)
In SQL Server Management Studio (SSMS), enabling Auto Recover ensures that your unsaved query files are automatically backed up at regular intervals. This reduces the risk of losing work due to unexpected crashes, power failures or system restarts. To do this,
Enable Auto Recover
- Go to Tools
- Click Options
- Click Environment
- Click AutoRecover

Make sure:
✔ Save AutoRecover information every X minutes
✔ Keep AutoRecover information for X days
Set it to:
- Save every 5 minutes
- Keep for 7 days
When enabled, SSMS periodically creates temporary recovery files for open query windows, enabling you to restore your work the next time SSMS starts after an abnormal shutdown. For developers and DBAs working with complex T-SQL scripts, stored procedures or maintenance queries, enabling Auto Recover is an essential safety measure that safeguards productivity and prevents data loss during development or administration.
Step 6: Change Font Size for Better Visibility
In SQL Server Management Studio (SSMS), adjusting the font size is one of the simplest and most effective ways to improve readability and reduce eye strain during long development or database administration (DBA) sessions.
Whether you are writing complex T-SQL queries, reviewing execution plans or analysing result sets, increasing the font size enhances clarity and minimises fatigue. To do this,

Change Query Editor Font
- Go to Tools
- Click Options
- Click Environment
- Click More Settings
- Click Fonts and Colours
- Increase size to:
- 12
- or 14 (recommended)
Click OK.

Optimising the font size improves visibility and boosts productivity, especially when working on large monitors or presenting SQL code during training sessions or screen recordings. (What to Configure in SSMS First?)
Step 7: Configure Startup Settings
In SSMS, you can control how the environment behaves when launching it — for example, whether Object Explorer automatically connects to the last used server, whether a new query window opens by default and which startup page appears. Configuring these settings helps to reduce repetitive steps, which is especially useful for DBAs and developers who connect to the same instances daily.
You can configure it to:
- Open Object Explorer automatically
- Restore previous tabs
Enable Restore Tabs

- Go to Tools
- Click Options
- Click Environment
- Click More Settings
- Click Startup

Check:
✔ At startup, open Object Explorer
✔ Reopen documents on startup
Proper startup configuration improves productivity, ensures a consistent working environment and creates a smoother experience when managing SQL Server instances.
Step 8: Enable Dark Theme (Optional but Popular)
SSMS 19 and newer support Dark Theme.
To enable:

- Go to Tools
- Click Options
- Click Environment
- Change colour theme to:
Dark
This reduces eye strain during long sessions.
Many professionals prefer dark mode.
Step 9: Configure Query Results Settings
You can improve how results are displayed.
Go to:
Tools → Options → Query Results → SQL Server → Results to Grid
Useful settings:
✔ Include column headers when copying or saving
✔ Display results in a separate tab
This makes exporting data easier.
Step 10: Set Default Database (Avoid Common Mistake)
Many beginners accidentally run queries on the wrong database, very dangerous in production.
Always check this dropdown in the query window:
Database selectorBefore running a query, confirm:
✔ You are in the correct database
This simple habit can save careers.
Step 11: Configure SQL Server Agent (If You Are a DBA)
If you plan to:
- Create jobs
- Schedule backups
- Automate tasks
Make sure SQL Server Agent is running.
In Object Explorer:
Right-click → SQL Server Agent
If it says Stopped → Click Start
If SQL Server Agent is missing, you may be using:
- SQL Server Express (which does not support Agent)
Step 12: Install Integration Services (If Needed)
If you plan to use:
- Maintenance Plans
- SSIS
- Import/Export Wizard
You must install:
Integration Services
Without it, the Maintenance Plan Wizard may crash.
This is common in newer SSMS versions. (What to Configure in SSMS First?)
Step 13: Keyboard Shortcuts You Must Know
These will make you faster instantly:
| Action | Shortcut |
|---|---|
| Execute Query | F5 |
| Results to Grid | Ctrl + D |
| Results to Text | Ctrl + T |
| Comment Code | Ctrl + K, Ctrl + C |
| Uncomment Code | Ctrl + K, Ctrl + U |
Learn these early.
Step 14: Enable Actual Execution Plan (Optional)
Very important for performance tuning, before running a query:
Click:
Include Actual Execution Planor press:
Ctrl + MAfter execution, you will see how SQL Server processes your query.
This is critical for:
- Developers
- DBAs
- Performance tuning
Step 15: Save Your Environment Settings
After configuring everything:
Go to:
Tools → Import and Export Settings
Export your settings to a file.
Now, if you reinstall SSMS, you can restore your setup instantly.
Professional habit.
Quick Summary Checklist
After installing SSMS, configure:
✔ Line numbers
✔ Results to Grid
✔ Auto Recover
✔ Font size
✔ Startup behaviour
✔ Query results options
✔ SQL Server Agent
✔ Integration Services (if needed)
✔ Execution Plan
These settings turn SSMS from “just installed” into “professionally configured.”
Final Thoughts
SSMS is not just a tool.
It is your daily workspace if you work with SQL Server.
A properly configured environment:
- Saves time
- Reduces mistakes
- Improves productivity
- Makes debugging easier
Whether you are:
- A student learning SQL
- A developer writing queries
- A DBA managing servers
- Or working with Azure SQL
Setting up SSMS correctly from the start makes a significant difference.
Take 15–20 minutes to configure it now.
Your future self will thank you.